There are many different directions to go in when it comes to part presentation stages—from that simple part built by the thousands yearly, to complex parts with different sizes and shapes. When making a presentation stage decision, start with the product mix and the parts’ typical requirements. For high-volume automated lines, we can put together integrated lines that are designed for a specific part, or a handful of products that can be handled with minimal tooling changeovers. Additionally, there is the question of manual presentation methods. This can allow the customer to be prepared for almost any part that may come in the future.
Presentation Methods
In regards to manual presentation methods for gold ball/bump bonding, some of the challenges (along with the X/Y dimensions of the parts) include:
- height variations from part to part
- heating of the parts,
- length of time required for heating
- keeping tooling reasonably priced
Our engineers have come up with many unique stages, and some of them (like our standard 4x6”stages) have stood the test of time and been in use for decades.
4x6” Stage
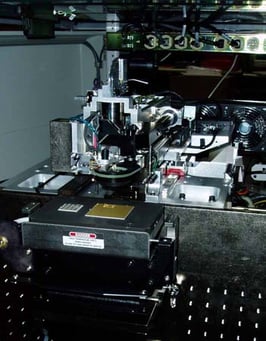
The 4x6” stage has a .5” tooling plate that can be easily removed, as well as alignment pins that allow it to be put in the same position repeatedly. There are vacuum channels in the heater stage that allow the user to tool holes in the top plate for vacuum. It also has mechanical blade clamping for either holding individual parts in place, or a metal top mask for multiple up-parts. Some customers with very high-mix and multiple investments in 4x6 tooling still purchase the 4x6 stages for their new 8000i Wire Bonders, or reuse the stages on the 8000i they have from their older systems. The 8000i with a bond area of 12x6” can actually utilize two of these 4x6 .jpg?width=190&height=77&name=Dual%20Heater%20Controllers%20on%208000%20(2).jpg) stages side by side. The stages have thermocouple feedback to a heat controller that allows you to keep the parts at a repeatable and accurate temperature.
stages side by side. The stages have thermocouple feedback to a heat controller that allows you to keep the parts at a repeatable and accurate temperature.
12x6” Stage
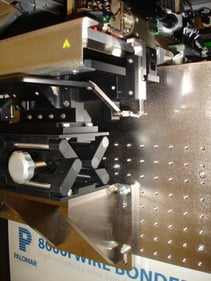
The 4x6 is only one example of a stage available for an 8000i. A 12x6” work area has stages that utilize the entire area and even allow for larger parts, as some parts have a bond area of 12x6 or less, but a total dimension that is even larger. The 8000i has a stainless steel tooling plate with screw holes on 1” centers.
| Z-Height In regards to Z-height, the stages can be manually mounted at different heights to allow for part thickness. Some customers utilize a precision scissor jack that can raise or lower a stage in small increments. The optics on the Z-head allows the 8000i to determine the height using either a Z-touch or an autofocus. If Z-heights vary slightly, the 8000i can compensate by using an autofocus capability. The 8000i has a full .8” of Z-travel, selectable optics, and Cognex® Pattern recognition supplemented with the new VisionPilot® with Radar Referencing® in order to be able to compensate for these Z variances. |
|
Custom Presentation Stages
Along with the existing selection of stages, there are also stages and tooling that are custom designed for specific parts. In the past, our engineers have designed for TO cans, flex, and a plethora of other types of packages. We also have a variety of wafer stages used for ball bumping wafers. It can be a challenge applying vacuum to hold the wafer in place without causing any type of cracking or other damage. Fixturing the parts/wafer to be held solid during ultrasonic bonding with either vacuum or mechanical clamping can be challenging. Palomar has the tools and the knowledge to be of assistance.
Download more resources here:
|
8000i Wire Bonder Data Sheet |
VisionPilot Data Sheet |
 |
|
----
Dale Perry
Eastern Regional Sales Manager
Palomar Technologies, Inc.